Saturday, June 16, 2018

Import Old Backups to iTunes When Music Lost


Import Old Backups to iTunes When Music Lost


If you have an old backups of iTunes that contains your lost music and you want to import this old iTunes backup music to the current iTunes that you use. You can do that if you have a backup on your computer or a hard drive, so the backup need to be available on your computer or external drive connected to your computer. We will show you now how to do it.
#1. iTunes Lost My Music? Import them from Old Backups on PC


Step 1. Find out where is your old iPhone backups and then copy the music to another folder. This folder can be created on the desktop where is easily to be found.


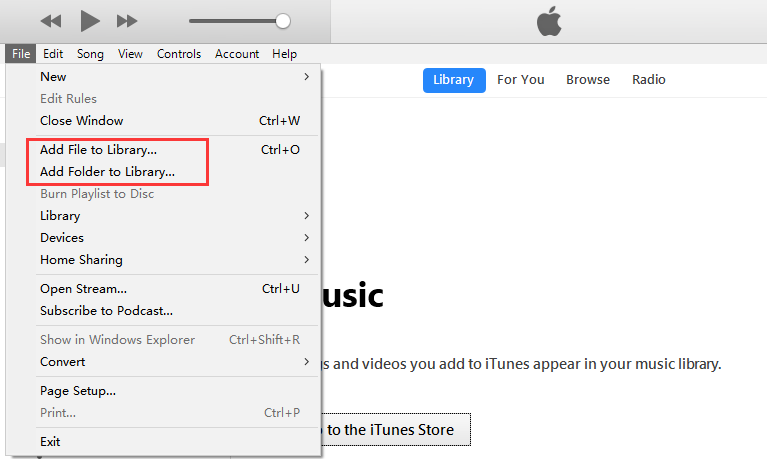
Step 2. Open iTunes. Click "File" on the upper left corner. And then choose "Add File to Library" or "Add Folder to Library".


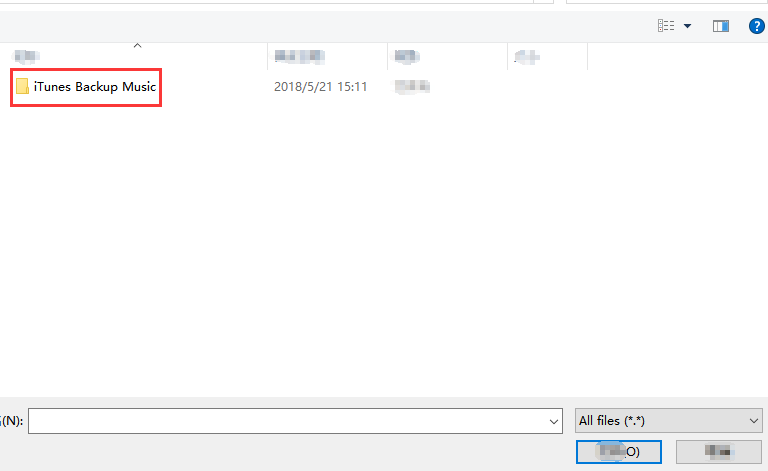
Step 3. Locate the music files or the music folder where you create on desktop.


Step 4. Click "Open". The music will be import to your iTunes Libarary. And now you get your iTunes Back.
#2. Transfer iTunes Backups from External Drive to iTunes


Step 1. Attach the external hard drive that contains the old iTunes backup to the computer.


Step 2. Navigate through the hard drive to find the iTunes music folder you backed up to it.


Step 3. Drag the iTunes music folder from the external hard drive to the desired location on your computer. In some cases, you may need to put it in the default location used by iTunes.


Step 4. While holding down the Option key on a Mac, or the Shift key on Windows, launch iTunes.


Step 5. Click "File > Add File to Library or Add Folder to Library” which is same as the last method.


Step 6. In this windows, you can browse through the folder that you copied from the external hard drive. On Windows, select the music file in the folder.


Gihosoft iPhone Data Recovery is a professional iPhone Data Recovery software to get back all your lost text message, photo, video, call history, note, contact and more from iPhone/iPad/iPod Touch. It offers a full solution to recover your lost data in different tough situations. Besides recovering data directly from iPhone, iPad and iPod touch, it also allows you to recover data from iCloud and iTunes backup files.


Step 7. Now click “Open”


Step 8. When it finish. You can now disconnect the external hard drive from your computer.

How to Create Contact Groups on iPhone (2018)

How to Create Contact Groups on iPhone (2018)

Create Contact Groups on iPhone (2018)

Part 1: Backup Your Device First


The first thing you must do is take a backup of your iPhone. It can’t be stressed enough how important it is. If your iPhone crashes when you are making a group chat, then you could lose a lot of your personal data.


Fortunately, this isn’t a common occurrence, but it isn’t worth taking the risk.
Part 2: How to Create Contact Groups on iPhone


After you’ve backed up your iPhone you can move on and use one of the following solutions to create contact groups on iPhone.


Sponsor ads:
Gihosoft iPhone Data Recovery Free


Make A Contact Group Using App
1Create Contact Groups on iPhone via iCloud


A popular way of creating iPhone groups is to use iCloud. This can make it easier to create large groups as a computer is used to do so.


On your iPhone, go to “Apple ID > iCloud” (or for older iOS, just tap “iCloud” from the main Settings menu) and enable the “Contacts” slider.


Go to a computer and open the iCloud website. Sign in to your iCloud account and click “Contacts”.


At the bottom-left, click the + icon and select “New Group”. Name it accordingly, click “All Contacts”, and drag the contacts you want into the group chat.


2Make A Contact Group Using App


You can also use a third-party app to create a group on your iPhone.


Open the “App Store” and search for “Groups”.


Download the app and open it.


Simply tap “Add New Group” followed by “No Contacts - Add Some” to add people.


Part 3: Tips You Should Know about Contact Group on iPhone


Now that you know how to create contact groups on iPhone, here are a few handy tips for managing your group chats.


1Delete Groups on iPhone


Are you in too many group chats? Here’s how you can delete them and remove yourself from them.


On a computer, go to the iCloud website and sign in using your iCloud account.


Choose “Contacts” and click on the group chat that you want to delete.


Click the settings icon at the bottom-right and click “Delete”. You need to click “Delete” again to confirm.


2Email Your Contact Group on iPhone


If for whatever reason you aren’t able to message in your group chat, you can email them. As long as you are signed into your email account on the Mail app then you will be able to do this on your iPhone.


Launch the “Mail” app and tap the compose icon at the bottom-right.


In the “To” entry, start typing the name of the group.


After a few letters, the group should be shown. Tap on it then enter your message and hit “Send”.


3 Send A Message to Your Contact Group


Finally, you can message the contact group through your messaging app. This is the most convenient way to go about messaging and managing your iPhone group chats and therefore it is ideal.


Open the iMessage app and tap on the compose icon at the top-right.


Next, tap the “To” space and enter the group name that you want to message.


Enter your text message and press the send button. This chat will be accessible for future messages unless you delete it. Gihosoft iPhone Data Recovery is a professional iPhone Data Recovery software to get back all your lost text message, photo, video, call history, note, contact and more from iPhone/iPad/iPod Touch. It offers a full solution to recover your lost data in different tough situations. Besides recovering data directly from iPhone, iPad and iPod touch, it also allows you to recover data from iCloud and iTunes backup files.


Wednesday, June 13, 2018

How to Unpair Apple Watch Without iPhone 2018

How to Unpair Apple Watch Without iPhone 2018

Part 1. Unpair Apple Watch directly from Settings


Let us make use of the settings option in your Apple watch in order to unpair your iPhone in its absence. The steps are very simple and you can complete the procedure in no time. Make a note of the given steps for successful completion of the process.


Step 1: Unlock your Apple watch and go to the ‘Settings’ option.


Step 2: Click on ‘General’ from the expanded list of Settings.


Step 3: Select ‘Reset and Erase all contents and settings’.


By choosing the reset and erase all contents and settings on your Apple watch, you will be able to restore the system to its factory settings thereby removing its old settings.
Part 2. Erase Apple Watch from Find My iPhone online


You can now make use of iCloud platform to remove the Apple watch paring settings from your iPhone in an online mode. Here you are going to use computer. Open you computer and go to the iCloud official website. Now sign in using your Apple ID credentials. Tap on ‘Find My iPhone’ and surf through the listed devices. Click on ‘Select all devices’ and choose your Apple watch from the displayed list. Select ‘Erase Apple watch’ and proceed with the ‘Next’ button. You have to click the ‘Next’ button until the Apple watch is completely removed from your iPhone. Finally tap the ‘X’ symbol near your Apple watch to unpair it from your iPhone.


You have easily erased Apple watch from iPhone in an online mode. To carry out this process it is enough if you sign in to your iCloud platform. Even in the absence of your iPhone you can now remove the pairing features of your Apple watch. This process will be really helpful during emergency situations at the time of loss.


Part 3. How to Unpair Apple Watch from iPhone


In case if the Apple watch and iPhone is in the close proximity then you can make use of the below given guidelines to carry out the un-pairing process.


Step 1: Place your iPhone and Apple watch nearby.


Step 2: Unlock your iPhone and launch your Apple watch.


Step 3: You can identify your Apple watch at the bottom of the screen and click on the icon.


Step 4: Select the ‘Unpair Apple watch’ option in order to alter the pairing settings between the iPhone and Apple watch.


Step 5: Confirm t the prompt regarding the un-pairing process again.


Step 6: The Apple watch gets detached from your iPhone in no time.


After this process iPhone will try to make a copy of the content available in the Apple watch for future reference. The un-pairing process leads to the deletion of the existing content present in the Apple watch. It is better to setup a backup to avoid unnecessary issues in future.

Do you like this story?

Sponsor Ads:
Gihosoft iPhone Data Recovery is a professional iPhone Data Recovery software to get back all your lost text message, photo, video, call history, note, contact and more from iPhone/iPad/iPod Touch. It offers a full solution to recover your lost data in different tough situations. Besides recovering data directly from iPhone, iPad and iPod touch, it also allows you to recover data from iCloud and iTunes backup files.

iPhone SE 2 Detailed: 3GB RAM, Three Colors, $399 Price Tag

Ming-Chi Kuo has detailed his expectations from the iPhone SE 2 after previously claiming that Apple will launch it in the first quarter...